📝 Bulk recipient uploads are available in Essentials, Premium, and Enterprise subscriptions only. If you're using a Free account and would like to add recipients by .csv, check out our subscription plans.
When your list is too big to add recipients one by one, bulk upload lets you send gifts to everyone at once, even when you want to add different gift messages or send dates. Here's how it works.
1. Downloading the list template
Before you get started
Before you begin uploading your recipients, there are a couple of important things to keep in mind:
1. Up to 500 contacts can be uploaded at once. If you wish to gift to more than 500 contacts, you'll need to repeat this process for each new batch of 500. Alternatively, if you're a Premium or Enterprise subscription holder, contact your Account Manager; we'd be happy to manage your list upload on your behalf.
2. Loop & Tie does not store contact records. The list you upload pertains only to your active gift send; Loop & Tie does not store contacts for later re-use. If you wish to gift to the same recipients again, you'll either need to upload a new spreadsheet or manually add them in a new gift send.
💡 Complete sending gifts to your active upload before re-entering the send-a-gift flow to add more recipients or a new list in order to prevent data loss.
Downloading the list template
In order to use the bulk recipient upload feature, you'll need to add your contacts to a .csv file in the format provided by Loop & Tie. To get the template:
1. From your portal, click 'send gifts' on the upper righthand corner of the dashboard
2. Choose a gift collection, go to the design stage and add a gift design, message and signature. If you're not planning to send gifts right away, you'll still need to type something in here (a single letter works)— you can't advance without a gift message and signature. Click 'next.'
3. Add your redemption page header or click 'next' to skip ahead if you're not planning to send gifts right now
4. On the Recipient page, click 'Import recipients' below the recipient entry form

5. From here you'll be prompted to download the .csv template

Using the list template
The list template includes the following fields:
-
Full name - Required
-
Recipient email - Required
-
Send date - Required
-
Subject
-
Message
-
Signature
-
Expiration date
-
Sent from email (Premium and Enterprise only)
Here's how to use each field.
Full Name- Required for your send. This should be your recipient's first and last name
Recipient Email- Required for your send. This should be the email address where you want your recipient to receive your gift
Send Date- Required for your send. The date and time you want your gift to deploy.
💡 Each gift in your upload can have a different send date and time. Just change the date and time for each line to match your preferred send date.
Ex. When uploading a list of employee birthdays to automate gift sends, match each send date to each employee's birthday in the line that contains their name and email address.
Subject- Not required. This is the subject line for your gift delivery email(s). If you do not add subject lines to your .csv, your gifts will default to the subject line you added in the Design stage.
⚠️ Subject lines included in your recipient import will overwrite the subject line you added in the email design stage of the send-a-gift workflow
💡 Each gift in your upload can have a different subject line.
Message- Not required. This is the message included in your gift delivery email(s). If you do not add messages to your .csv, your gifts will default to the gift message you added in the Design stage.
⚠️ Gift messages included in your recipient import will overwrite the gift message you added in the email design stage of the send-a-gift workflow
💡 Each gift in your upload can have a different gift message
Signature- Not required. This is the name your gift delivery email will be signed with. If you do not signatures to your .csv, your gifts will default to the signature you added in the Design stage.
⚠️ Signatures included in your recipient import will overwrite the signature you added in the email design stage of the send-a-gift workflow
💡 Each gift in your upload can have a different signature
Expiration Date- Not required. This is the date your recipient will no longer be able to redeem their gift. If you do not add expiration dates to your .csv, your gifts will default to 1 year from their send date.
💡 Each gift in your upload can have a different expiration date
📝 When a gift expires, the amount you spent on that gift is returned to your portal as Loop & Tie credit. Credits can be re-used for sending new gifts; by shortening your expiration timeline, you may be able to access unused credit sooner.
Sent From email- *Premium and Enterprise Subscriptions Only* Not required. The email address included in the 'Sent From' column will receive a weekly rollup report of the status of all gifts in your upload, as well as any Thank You notes that are entered by your recipients.
💡 Sent From is a great way to keep stakeholders up to date on gift performance. Ex. When sending employee anniversary gifts on behalf of individual team leads, include those managers in your 'Sent From' column so they see who among their team was gifted, their gift status, what they picked, and their thank you notes.
📝 Sent From does not change the delivery email address or the signature line of your gift emails. By default, gift emails are delivered by hello@loopandtie.com. To change your gift delivery email, see 'Using Email Domain White Labeling.' To change your gift email signature, see the 'Signature' section above.
Uploading your recipient list
Once your template is filled in, it should look similar to this example: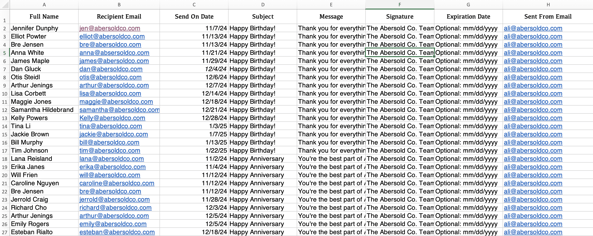
It's important that you use our template in this stage to ensure all information maps correctly to your gift send. When you're sure all the information in your document is complete and accurate:
1. Jump back into the send-a-gift workflow by clicking 'Send Gifts' on the top right corner of your Loop & Tie portal. Choose a gift collection, design your gift email, and design your gift redemption page header.
📝 Many of the fields in the recipient upload document overwrite entries from the gift email design stage. To reference which fields can be overwritten with the recipient upload document, see 'Using the list template' above.
2. On the 'Recipient' step of the send a gift workflow, click 'Import Recipients,' then 'Get Started.'

3. Click 'Choose a File' and select your recipient list OR drag your recipient list into the drag-and-drop field.
4. Once your list processes (this can take a couple of minutes depending on list size), you'll be asked to identify the row in your document that contains column headers. Either confirm the selection, choose a different row, or indicate that your upload does not contain a header row.

5. Next, confirm the mapping of each of your columns. For each column, select 'Confirm mapping' or 'Ignore this column.' Once you've confirmed the mapping for each column, click next on the bottom right.

6. Once your columns are mapped, you'll be asked to review any errors in your sheet.
Errors can be fixed by clicking on the highlighted fields and typing a new entry into that cell. Errors in orange can be ignored if you choose; errors in red must be fixed to move on.
In the example below, duplicate emails in the 'Recipient Email' column are highlighted in Orange. This sheet does not contain expiration dates: the sample copy in this column needs to be deleted before moving to the next step.
When you've reviewed or fixed any errors, click 'next' on the bottom right to move on.

7. Once you've completed your review, you'll be asked whether you want to keep going with any remaining errors. Rows containing errors in red will be removed before you can move on; make sure to edit these so you don't lose data.
From there, the pop-up window will close and you'll be back at the recipient stage. All recipients from your spreadsheet should now be listed as individual entries on this page.

8. Click next and proceed to finalize your gift send as usual.