📝 Before you get started with email domain white labeling set up, keep in mind that this feature is only available for accounts with Essentials, Premium, and Enterprise subscriptions. Ready to upgrade? Check out our plans and pricing.
Email domain white labeling in Loop & Tie allows you to send gifts from an email address attached to your own domain, i.e. "marketing@olivegroup.com" or "dan@zmangames.com."
If you don't have email domain white labeling turned on, your gift emails are automatically deployed by hello@loopandtie.com, though you may change the From name to help your recipients identify you as the sender.
💡 Only one email address can be used across each team; we recommend using a generic email, like "sales@coolguitars.com" instead of a single person's email address.
Before you get started
In order to set up email domain white labeling, you'll need access to manage your company's domain. Domains are generally managed through your business's GoDaddy, Google Domains, or similar domain provider's account.
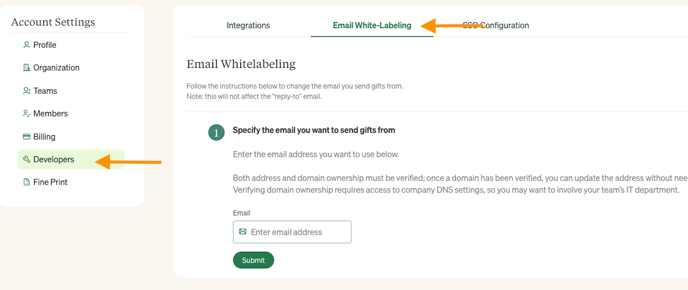
Step 1:
In your Loop & Tie account, navigate to your account settings from the bottom of your lefthand panel menu. Then, select the 'Developers' tab on the lefthand side. Finally, toggle to 'Email White Labeling' on top of the 'Developers' panel
Tip: Make sure you're adjusting settings for the correct team by checking the Teams dropdown on the top left of your portal.
Step 2:
Enter the email you'd like to send gift emails from in the 'Email' field, then hit 'Submit.'
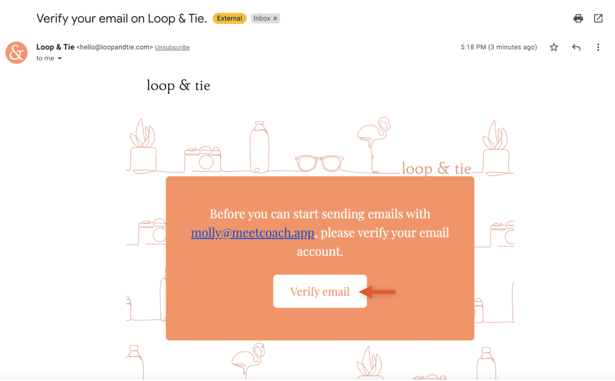
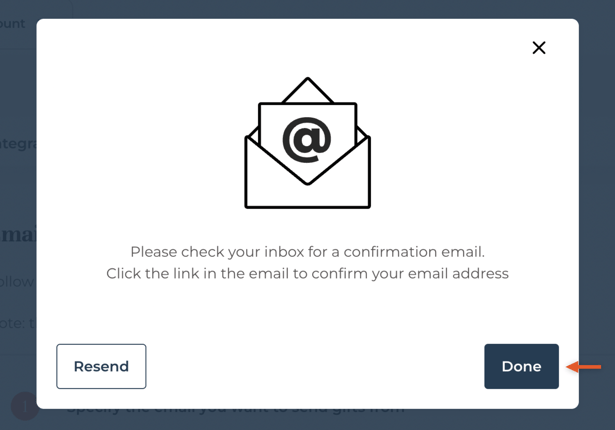
Step 3:
Once you hit submit, you'll receive a popup asking you to confirm the email address you entered. Click the 'Verify Email' button in the email you received from hello@loopandtie.com, then click 'done' in the Loop & Tie portal.
Step 4:
Log into your domain provider account, then navigate to manage your DNS settings. Add two DKIM records as "CNAME" records, and SPF, DMARC, and Verification Code records as as individual "TXT" records.
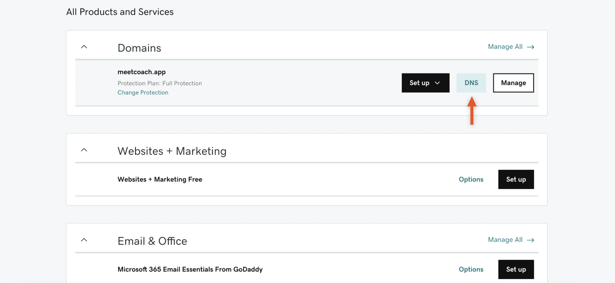
In GoDaddy:
1. Click on your account name and choose 'My Products' from the dropdown menu:

2. Scroll down to 'My Domains' and click 'DNS' next to the domain you're adding:
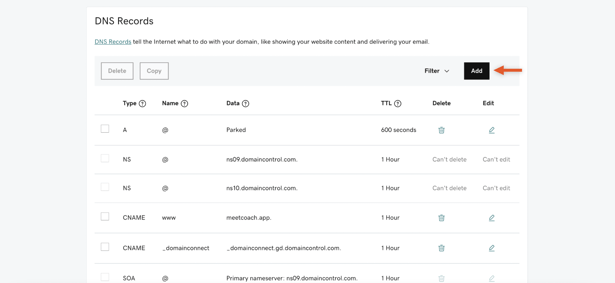
3. On your DNS Management page, click "Add" to add the Loop & Tie domain records. You'll need to repeat this step for 5 records:
💡 Please note that as of March 15, 2024, email platforms like Google and Yahoo have introduced additional requirements for sending platforms that include an additional DKIM and a DMARC record.
DKIM 1:
1. Choose "CNAME" as the record type from the dropdown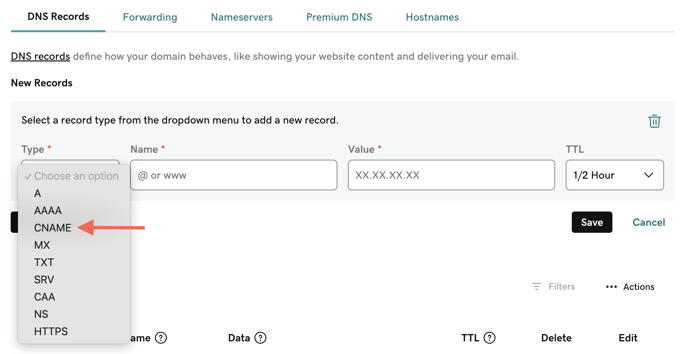 2. In the Loop & Tie portal, click "Copy" next to the "Host" field in in the first DKIM record, and add that text to the "Name" field in GoDaddy
3. Next, click "Copy" next to the "Value" field in the first DKIM record and paste it into the "Value" field in GoDaddy
4. There is no need to change the update the TTL setting when adding for DKIM records
DKIM 2:
1. Add another record
2. Repeat steps 1-4 above for DKIM 2
SPF:
1. Add another record
2. Choose "TXT" as the record type from the dropdown.
3. Enter "@" in the "Name" field
4. In the Loop & Tie portal, click , click "Copy" next to the "Value" field in the SPF record and paste it into the "Value" field in GoDaddy.
5. There is no need to update TTL settings for the SPF record.
DMARC:
1. Add another record
2. Choose "TXT" as the record type from the dropdown.
3. In the Loop & Tie portal, click "Copy" next to the "Host" field belonging to the DMARC record, and add that text to the "Name" field in GoDaddy.
4. In the Loop & Tie portal, click , click "Copy" next to the "Value" field in the DMARC record and paste it into the "Value" field in GoDaddy.
5. There is no need to update TTL settings for the SPF record.
Verification Code:
1. Add another record
2. Choose "TXT" as the record type from the dropdown.
3. Enter "@" in the "Name" field
4. In the Loop & Tie portal, click , click "Copy" next to the "Value" field in the Verification Code record and paste it into the "Value" field in GoDaddy.
5. There is no need to update TTL settings for the SPF record.
Step 5:
Once all 3 records are added, click 'Refresh' at the bottom of the email white labeling page in the Loop & Tie portal. If the records have been added correctly and your provider has updated them, you'll get a message confirming that your domain has been verified.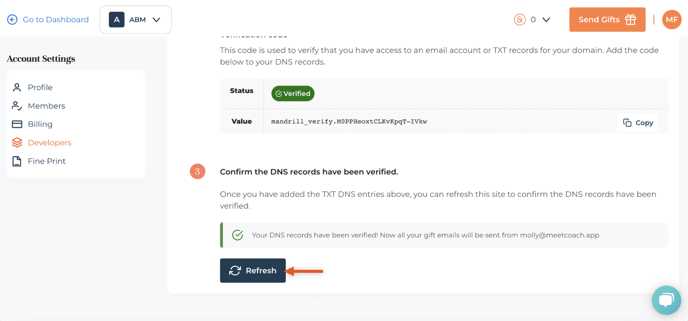
Once your domain is verified, your team's gifts will automatically be delivered by the email address you chose in step 2.
Happy gifting!
Troubleshooting Domain Verification
If your domain cannot be verified after you click refresh, start here:
Step 1: Double check each record has been entered correctly
Review each record in the DNS settings of your domain (in your domain provider account) to ensure all three records have been entered correctly. Check for accidental spaces before and after each record, ensure each snippet was copied and pasted in its entirety, and that you captured all three unique records (instead of accidentally adding one twice).
If everything looks correct, move on to step 2.
Step 2: Hold tight- your domain may not have updated yet
While this timeline is often shorter, changes to your DNS records can take up to 24 hours to populate. Click 'Refresh' again later; if your domain still hasn't been verified after 24 hours, move to step 3.
Step 3: Contact your Loop & Tie Account Manager
While we can't log into your domain provider account, we're happy to check what our product is telling us on the back end. We may be able to identify the error and instruct you how to fix it.
Unfortunately, most often if there is a problem in verifying your domain, its root cause is on the domain provider side. If we can't help you identify a fix, you'll need to move to step 4.
Step 4: Contact your Domain Provider's Support Center
GoDaddy, Google Domains, or another provider may be able to help you troubleshoot on the domain side.